Quilting is a beloved craft that allows us to create beautiful and functional pieces of art. If you’re looking for a project that combines simplicity and elegance, the Hunter’s Star quilt block is a perfect choice. With its intricate design and clever construction, this block is sure to impress. In this article, we will guide you through the process of making a quick and easy Hunter’s Star quilt block, providing step-by-step instructions that will help you bring this stunning pattern to life.
Understanding the Hunter’s Star Quilt Block
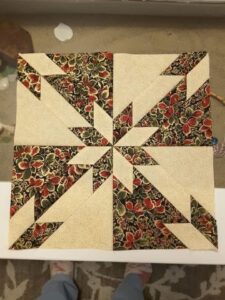
The Hunter’s Star quilt block is a classic design that features a combination of triangles and diamond shapes, forming a captivating star pattern. While it may seem complex, this block can be simplified with a few clever techniques. By breaking it down into manageable steps, you can create a stunning Hunter’s Star quilt block without feeling overwhelmed.
Gathering Your Materials
Before you begin, gather the necessary materials for your project. You will need fabric in contrasting colors, a rotary cutter, a cutting mat, a ruler, and a sewing machine. Choose colors that complement each other and create the desired effect for your Hunter’s Star quilt block. Once you have your materials ready, you can move on to the next steps.
Cutting and Piecing the Fabric
To create the Hunter’s Star quilt block, start by cutting the fabric into the required shapes. This will typically involve cutting squares, triangles, and diamond shapes. Follow the measurements and instructions provided in your chosen pattern or tutorial to ensure accuracy. Once you have all the pieces cut, it’s time to start piecing them together. Take care to align the seams and sew with precision, ensuring that your points match up perfectly.
Assembling the Block
As you piece together the triangles and diamond shapes, you will start to see the Hunter’s Star pattern emerge. Take your time and double-check the placement of each piece before sewing. Press your seams carefully to achieve a neat and professional finish. As you assemble the different sections, you will notice the magic of the Hunter’s Star quilt block coming to life.
Creating a quick and easy Hunter’s Star quilt block may seem like a challenging task, but with the right instructions and a bit of patience, you can achieve remarkable results. Whether you’re a seasoned quilter or a beginner looking to expand your skills, this project offers an opportunity to explore a captivating pattern and create a stunning quilt block. Follow the step-by-step guide outlined in this article, and soon you’ll have a beautiful Hunter’s Star quilt block to incorporate into your next quilting masterpiece. Enjoy the process and let your creativity shine!


